Hello once again fellow scrappers! Today's project is one I don't do very often--a card! As you can see it's not your typical card--after I made it I realized that you probably wouldn't be able to fit this card into any nomal envelope! So I guess it's made for putting in a padded envelope or for giving to someone in person. Just added way too much dimension on this one!
I did a lot of matting and went with very simple to hardly any coloring at all with this one.
The stamp is called 'Friends Don't Mind' & is by Tom Allen. His stamps used to be sold via Cornish Heritage Farms--but that is no longer the case. At this point I wouldn't know where to find his 'kritter' stamps. They were really cute!
Where I really added some bling was to the balloons. I used a glue pen to color in my balloons and one by one glittered them with coordinating glitter. I tried to get the best picture as possible--in person these balloons are very shimmery.
I kept the critters in the stamped image pretty much to the black ink they were stamped in. All I did was add a bit of pink color to the flowers in the background and I also added a dot of Diamond stickles to the center of each flower to dress them up more.
With a Perfect Pearl pen by Viva Decor I added those pearly dots all around the border of my image.
This mini vine is actually a vine I bought from my local Michaels some time last year around Valentine's day. I trimmed it a little & placed it behind my stamped image. I then adhered a ribbon to it and added a handmade paper flower to the center of the ribbon.
I tucked a bit of light pink tulle underneath the two flowers to soften the card a bit.
My image is matted on card stock cut with Spellbinders circle & scallop circle dies.
A very simple card to give to a special friend or special someone in my life!
Enjoy the rest of your week!
Aug 26, 2012
Aug 22, 2012
Clear Scraps DT
Yay me!! Just wanted to quickly share the news that I've been invited to join the Clear Scraps DT!
I've always enjoyed incorporating and experimenting with acrylics whether it be on a layout, card or even a mini album. Because of the clear nature of this product--it really opens up the possibilities for some innovative & creative effects & projects!
You can check out the official announcment here as well as get to know the other newest DT members.
Am looking forward to this new creative journey!
Aug 15, 2012
Autumn Layout
Hello once again fellow scrappers! It's time for another reveal over at Once Upon A...Sketch (OUAS). This month's theme is: Season (Summer, Autumn, Winter, Spring).
For me this was a no-brainer. I've been an Autumn fan my whole life. I love the colors that come with Autumn, the changing of the leaves, the crisp mornings, the immaculate blue skies. It's Mother Nature at her best. I know many people love Summer--but for me Summer here in the North East is just too humid for comfort. I don't mind hot--but when you add humidity into the mix--that's when you lose me! In addition, I was married in the Autumn and this is what this page represents.
This is me & my hubby almost five years ago celebrating our first year wedding anniversary. We went away to a Bed & Breakfast when the foliage was at it's most colorful. I incorporated as much of the colors that I witnessed on this getaway as I could on this page. It was a mixture of burgundy, browns, golds, yellows, oranges and just a hint of green. The turquoise splashes here & there represent the blue skies--which in October the sky is usually as blue as it can get!
Here's the sketch provided by Nadia that is to be used for this challenge.
The background is paper from Tim Holtz's Kraft Resist Cardstock. I added a hint of turquoise to it by randomly inking it with Tumbled Glass distress ink.
The chipboard title & fence are by Imaginarium Designs. For the fence I kept it simple. I simply inked it with embossing ink & then heat embossed it with Kaleidoscope embossing powder by Stampendous. In person, this gives off such a shimmery effect. I tried to capture it as best as I could here.
I finally got to use a peacock feather I've had in my stash for ages!
These butterflies will soon be the latest addition to my Etsy shop. They were the perfect finishing touch to this page.
In the background I also randomly stamped the 'Bubble Wrap' stamp by Donna Salazar with Aged Mahogany Distress Embossing powder. Once embossed, I scratched off a bit of the powder with my finger in order to give it a more shimmery effect.
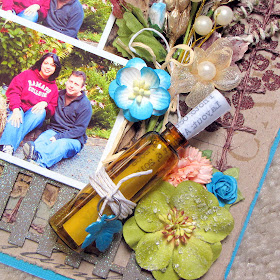
A close up of one of my clusters. This is a mixture of Prima flowers, mulberry flowers from my stash, handmade flowers and beads, pins & trinkets from my own stash. A Prima crystal flourish is in the background.
My other lil' cluster. Once again this is composed of a handmade flower, mulberry flowers from my stash and other trinkets from my stash. In the bottom is a bright orange crochet doily and I tucked a bit of light turquoise tulle in the bottom as well.
To give the title some shimmer & texture it was first painted with gesso--then spritzed with the following: Pralines & Cream Smooch, Cashmere Smooch & Terra Cotta Spritz by Shimmerz. It was then heat embossed in order to have all those mists soak into the chipboard. Finally I gave it a coat of Glossy Accents.
I once again stored my journaling inside a brown glass vial. I wrapped a bit of twine around it & adhered a leaf charm to it.
Thanks to all of you who stop by for a visit--do take the time to visit the OUAS blog and check out the other talented DT's take on this challenge and to play along!
Enjoy the rest of the week!
Aug 8, 2012
Carnation Tutorial
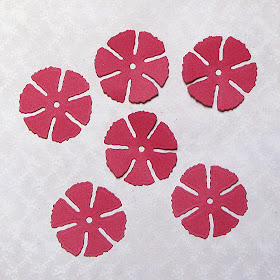
For these flowers I'm using Spellbinders Carnation Creations die by Donna Salazar. These dies seem to be made for carnations since they're named after the flower! So I figured why not make a carnation flower!? You can use any size die--it depends on what you need for your project. For this tutorial I used the second to largest sized 6 petal flower.
Step 1: You'll need 6 layers for this flower.
Step 2: If you're making a dark colored carnation you may consider inking it's edges with white since this gives the flower a more realistic resemblance to a carnation flower. Here I've used Jasmine Mix'd Media Inx also by Donna Salazar. This ink is basically like a white chalky ink and is perfect for darker colored card stock.
Step 3: These next few steps will seem very familiar since they're basically the same steps used for the ruffled flower. Take your bottom 3 layers & bend them in half.
Step 4: Then with round nosed pinchers, a skewer, a stylus or even the handle of a thin paint brush--curl the corners of each petal downwards as shown.
Step 5: Your petals should like like a wide curly 'V' when you curl the ends.
Step 6: On a foam pad or even a mouse pad--anything soft--shape your layers by cupping them with a stylus or any object with a rounded tip. You do this by pressing down in the center & going around the center of the flower in a circular motion.
Step 7: Adhere your bottom 3 layers with adhesive--I love my glue gun & use it frequently for my flowers. It dries fast & holds strong. Don't forget to alternate your petals.
Step 8: Take your top 3 layers next. Shape two of the layers the same way you shaped the bottom 3 layers. Take your top most layer and snip out one petal as shown.
Step 9: Close the gap left by removing that one petal by overlapping the two side petals and adhering them together as shown. You'll end up with a layer that looks like a little cone.
Step 10: Now shape your top layer just like all the other layers and shape them with your stylus on the foam pad/mouse pad.
Step 11: When done shaping--it's time to adhere your top layers to the bottom layers. Cup your top 3 layers as shown and adhere them to your bottom layers. Again...alternate those petals!
Step 12: If you cup your top 3 layers tightly you'll end up with hardly any room in the center. However, if you end up with a small hole as shown here...well that's what your snipped petal comes in. Shape that one lonely petal the same way you did the others...the fancy 'V'!
Step 13: Then adhere that one petal right smack dab in the center....ta-da...no more hole!
Here's another take...don't want your typical carnation or want to make a fancier flower--add stamens to the center for a different look.
Thanks for stopping by & I hope you enjoyed this tutorial. Have a great week!
Aug 2, 2012
Sad Puppy Eyes Layout
Good evening fellow scrappers! Today's page is one I did for the current challenge going on over at Colors...Stories...Inspiration C.S.I. I fell in love with their current color challenge and had the perfect picture of my little Toby to scrap.
Here's my Toby giving me his best 'sad puppy eyes'. He tends to give me these whenever he does something naughty--it's his way of getting away with things. I take one look at his adorable big, brown childlike eyes and I'm done being angry with him! To me he'll forever be a little 2 year old boy trapped in a furry body.
Here's the color combo & challenge my page is based on. As I describe my page I'll highlight what I used as my 'Evidence' & what I used as my 'Testimony' for the challenge.
Here's a bit of crazy, random hand stitching. I actually used a stamp from Kaisercraft's Technologic collection to create this crazy random stitching. TIP: Stamp any image on vellum or any other kind of transparent paper and use it as a guide for stitching. That's what I did here. I stamped the image on a piece of vellum and then with my paper piercer used the stamped image as a guide to pierce my holes. A shout out goes to Ngaire who recently used this same stamp on one of her pages & therefore allowed me to discover this fabulous stamp.
The random 'drips' are also a stamp. These are part of my 'Evidence' for the C.S.I challenge. I used brown Staz On to stamp these since I'm stamping on Pink Paislee's Mistables paper. They're supposed to 'resist' ink...so if you want to stamp on these you need those strong permanent, solvent inks like Staz On.
My brief journaling is my 'Testimony'. I used a distressed frame to display it. I printed my journaling on a transparency & then adhered it with clear dry glue.
The metal circles are also part of my 'Evidence' as are those light pink organza ribbon flowers.
The random inking I did in the background is a combination of two distress inks: Spun Sugar & Crushed Olive.
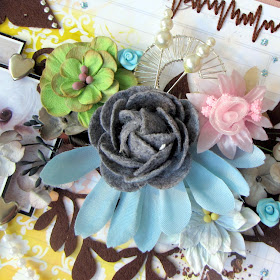
A close up of my other cluster of flowers, bits & bobs. The felt gray flower is by Jolees and the mulberry light teal & green flowers are by Petaloo. Underneath all of my flowers you'll see some felt branches. These are by Prima. I've had these in my stash since forever! So happy to finally use them.
Thanks to all of you who stop by for a visit! Have a great weekend...