Good evening fellow scrappers & bloggers! Today I bring you a page titled 'Brothers'. This is my husband (far left) along with his two older brothers. Yep, he's the baby--in more ways than one! Shhhh, don't tell him I said that!
This was taken on Thanksgiving 2010. This was truly a monumental event! These three haven't been under the same roof since when they were teenagers...the very next day we got about 24" inches of snow (no kidding) so that's how miraculous it was to have these three together again! Them being together even seemed to disrupt Mother Nature. They all live in different states--which is why it's hard to get them together.
Needless to say my in-laws were ecstatic to have the three brothers together again & I went photo crazy. Luckily they posed for me for not just one but several pictures--this one being my favorite. I plan on giving this page framed to my mother-in-law. I think she deserves it! :-)
This is a very 'manly' page. It had to be! My brothers-in-law would drop kick me if I made anything dainty with thier pictures in it. So I went all out with the grunge look!
I used papers from the February "Things Remembered" Swirlydoos kit & did a whole lot of stamping, masking & inking. I've come to the conclusion that I'm a stamper. I LOVED making my own background on this page & have been stamping on my pages more & more. So I think I finally found my calling. :-)

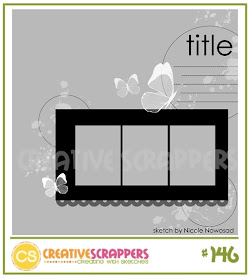
I also did this page for Creative Scrappers. I based this page on thier Sketch #146. Here's the sketch:

Besides stamping the background I also stamped on the burlap. You can see a little bit of it here in this picture. I did the woven stitch around my title. For a tut on this woven stitch, please go here.
The quote I found on the internet & found it to be just right for this page. It reads: "A brother shares childhood memories and grown-up dreams"

A closeup of some of the stamping, misting & masking I did for my background.
I'm starting to upload small 'stamping tips' here on my blog. For a quick tip on how to make your own shaped stamped collages like this one, feel free to go here.
I also have a tip on how to get that streaked, distressed look you see on my background page--please refer here for that quick tip.

I used a Tim Holtz mask for the clock. I then did a zig-zag stitch all around the border of the clock.
I cut out a circle that was larger than the clock & used that circle as a mask for the inked orange circle going around the clock.

This page wouldn't be complete without a 'man flower'...so here's my version of it. I made this flower from burlap. For a tutorial on how this flower was made--please feel free to go here.
The other two smaller burlap flowers are by Prima. They were white burlap--I misted them with Tuscan Sun glimmer mist.

The brick chipboard is from Dusty Attic. I inked it with Vintage Photo distress ink, then heat embossed it with Vintage Photo embossing powder. I removed some of the bricks out from the 'wall' & adhered them with pop dots in order to make them stand out from the rest of the bricks. For the bricks that are standing out, I then spread some Walnut Ink distress stickles on them.
I hope I did my brothers-in-law justice & made for them a very 'manly' page.
Thanks to all who stop by--I truly appreciate your visit.
Till my next post...

What a BEAUTIFUL piece of art! Your tutorial is inspiring and the way you have put all the techinques to such good use is AMAZING!
ReplyDeleteLacing and stitching are beyonnd any compliments! You're a queen of lacing =) Awesome details - very masculine and attractive. The bricks, the flowers, the sand, very cool!
ReplyDeleteStunning page!!!!!!!! Love all the techniques and details you add to your projects, just beautiful! Also, thanks for sharing with us your talent and putting together these wonderful tutorials!
ReplyDeleteSo many wonderful details... the stitching, stamping, burlap flower. Love the chippie and the 'MANLY' feel of this page. Headed off to your tuts!
ReplyDeleteMe encanta como te quedo porque aunque le pusistes flores se sigue viendo bien masculina tu pagina.
ReplyDeleteMuchos detalles hermosos, como siempre!! voy a ver el tuto...
Un Abrazo!!!
REally amazing work....cannot wait to thoroughly browse through your blog.....your details are DIVINE!
ReplyDelete