Lately in several of my layouts I've incorporated my journaling in the form of a scroll. It's great for when you have lengthy journaling or a story to tell with your page & don't want to take up too much room or simply don't have the room. It also makes for a unique embellishment to go along with your page.
I've been asked by a few to create a tutorial on how I go about making this scroll journaling--so here it is!
Step 1: Print your journaling on whichever media you plan on using. I tend to print my journaling on vellum. You can either mat your journaling or choose to leave it as is. I've done both ways on my pages.
My journaling tends to be 3" inches wide by 6" inches long. These measurements can vary based on where exactly you plan on placing your scroll. For the most part this is the measurement I've used.
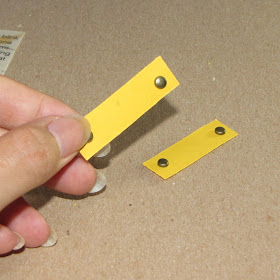
Cut out two strips of paper from sturdy card stock. Make sure it's strong card stock since these will be the straps holding your journaling in place. Strips of paper are 1/2" an inch wide by 1 3/4" inches long.
You'll also need 4 brads.
Step 3: Insert the brads through the punched holes.
Step 4: With your fingers shape your strips. Bend both ends upwards and curl the center of the strips into a loop as shown.
Step 5: Adhere the strips to your page with strong permanent glue. I tend to use a glue gun for this step. Make sure that when you adhere the strips that you position your strips in a way that you leave the curve of the loop you created with enough room to slip your scroll journaling through.
Step 6: Roll up your journaling with either your finger, pen or paint brush handle. I have several paint brushes so I use these to curl my journaling.
Slip your scroll journaling through the straps & you're done! Here's what your scroll journaling should look like.
Thanks for stopping by & I hope this tutorial helps some of you in storing lengthy journaling and/or stories.


This is such a great idea and really beautiful. TFS!
ReplyDeleteYou are such a clever chickie! Love this idea! xoxo
ReplyDeleteI have admired this little touch on you page when you used on one of you pages at CSI such a lovely idea. Thanks for sharing.
ReplyDeletethis is an awesome idea, thank you for showing how you did it,
ReplyDelete