Hello once again fellow scrappers & happy Hump Day! Today I'm bringing to you yet another brief flower tutorial. I guess I've been on a 'handmade flower' spree lately for some reason. It may be that Autumn is finally just around the corner which is my favorite season! These flowers do make a nice addition to Autumn themed pages & projects--at least that's how I would use them.
I named these after the marigold flower. I think that's the flower they most resemble. From what I saw online, the majority of marigolds are yellow/orange in color. I made a purple one as you can see here just for kicks! Hey who is to say we have to be so exact right?
Ok onto the tutorial...
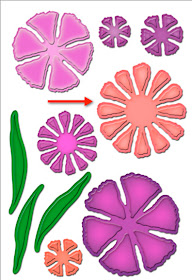
I once again used the Spellbinders Carnation Creations die by Donna Salazar. I indicated with an arrow the specific die I used for this flower.
Step 1: Cut out 6 flowers. Take one of these flowers and snip out two of the petals. Take another one of these flowers & snip out three of the petals as shown here. Do not throw out the snipped petals--you'll need them later!
Step 2: Ink your petal edges. I used a chalk ink by SEI for my inking--color is Cherry. The inking of the petals really works here because most marigolds actually have that two-tone look on their petals.
Step 3: All my petals have been inked. Even the petal snippets as you can see here
Step 4: With the handle of a thin brush (which is what I used), a wooden skewer, a stylus, a thin pencil etc...take your bottom three layers and start curling their petals down as shown here
Step 5: Once you curl your petals; cup your layers by taking a stylus or even a pencil or the handle of a thicker paint brush & in a circular motion press down on a soft surface. I have a foam mat by McGill that I use to shape my flowers. If you do not have a foam mat I found that turning your mouse pad upside down works just as well. You just need a soft surface so that your layers cup as you press down in a circular motion
Step 6: Time to adhere your bottom 3 layers. As you adhere, try to off-set your petals. Once done, your flower should look close to what is shown here. By the way, I use a small hot glue gun for all of my flower making. It's fast and makes for a strong bond.
Step 7: Take the two layers where the petals were snipped. You are going to overlap the two petals in order to eliminate the gap left by the petals that were removed. Adhere these petals with your glue
Step 8: This is what your snipped layers should look like once adhered. They will end up looking like small cones
Step 9: Take your final 3 layers and curl the petals down as shown in step 4.
Time to adhere your last 3 layers. The top three layers need to be cupped tightly as shown here prior to adhering. You are building your flower up. So you want a 'fluffy' look
Step 10: This is what your flower should look like with all 6 layers adhered. Notice that you'll end up with a small hole right in the center. Well this is where your snipped petals come in
Step 11: I usually start with the 3 snipped petals. Curl them down just like all the other petals and fold the snippet in 1/2 as shown. Then you're going to adhere these 3 little petals right smack in the center of your flower
Step 12: Voila! No more hole in the center! If by any chance you still have a little hole...then take your remaining 2 snipped petals & do the same procedure. Curl the petals down, fold them in half and tuck them right in the center.
Once done you can finish shaping your flower. Usually when I put my flowers together they get lopsided, squished, etc as I adhere one layer on top of the other. Once done you can re-shape your flower again--fluff the layers, re-curl some of your petals etc.
Hope some of you found this tutorial useful! Have a great rest of the week.


Hi, Hola Kay
ReplyDeleteSuper wonderful flower tutorial. Thnaks!~
-Sony
sonia-studio60.blogspot.com