

Good evening once again fellow scrappers! It's a Sunday evening & I'm clinging to it for dear life. I REALLY don't want to go back to work tomorrow...but what can you do? Just keep playing the lotto & hope that Lady Luck will one day pay me a visit...
I thought I'd share a brief tutorial on how I went about making these flowers. They're made out of water color paper. Water color paper is excellent for creating flowers or any kind of embellishment where you wish to use pigment powders such as Perfect Pearls for applying color & shimmer. For this particular flower I used Mandarin Perfect Pearls with a hint of Copper. Besides any kind of pigment powders & water color paper (I found water color paper at my local Michaels; this should be available in any arts & crafts store) you'll also need a water color pen which can also be found at your local Michaels or arts & crafts store. So let's get started!

Step 1: For the main flower I used Tim Holtz's Tattered Florals die. I used 3 of the long petal flowers cut from water color paper. For the center I used the retro flower punch (I used the smallest punch). You'll need 6 retro flowers

Step 2: Take your water color pen & squeeze a drop of water from it. Once the tip of the pen is wet dip it into the pigment powder. The pigment powder will stick to the wet brush. Mix it up with your water color pen until you get the consistency you want. I tend to go for a thick consistency. Paint your flowers as desired with your water color pen

Step 3: Once done coloring your flowers--heat set them with a heat embossing tool. That's the other good thing about water color paper--it dries quickly

Ste4: Now to shape your flower. Bend all the petals up at the base

Step 5: Next curl each petal down with the end of a pencil or thin paint brush

Step 6: Finally adhere all three layers by off-setting the petals. You'll end up with a little cup in the middle which is where the center flower will go

Step 7: To make the center flower--first ink the edges to define them more. I used Sienna chalk ink pad by Color Box.

Step 8: Take 4 of the 6 flowers & bend the petals upward at the base as shown

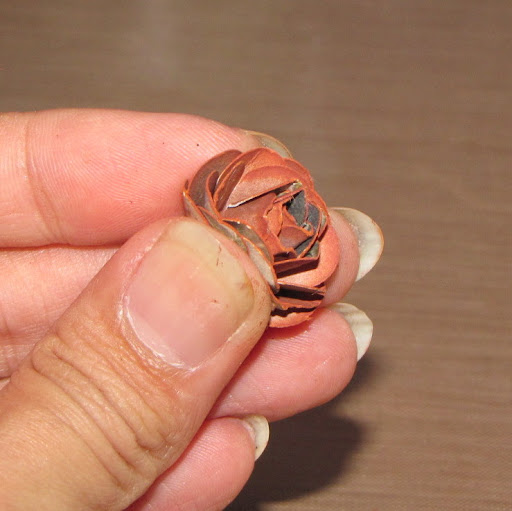
Step 9: Take the two remaining flowers & pinch each petal in half. (This picture also made me realize that I'm in bad need of a manicure!)

Step 10: Take one of the pinched flowers, fold it up & pinch the entire flower

Step 11: Roll it back & forth between your fingers to get it as tight as possible. Add drops of glue inside in order to glue it together--you'll end up with a small bud

Step 12: Take the bud & glue it into the center of the second pinched petal flower. Wrap the second flower around the bud & pinch this as well. You'll end up with a thicker bud

Step 13: Take the bud & adhere it to the center of one of the other flowers. Keep layering your flower in this manner & remember to off set the petals of each layer. This is what your flower should look like when done. TIP: These would make cute little flowers by themselves too. Just shape it a bit more by squeezing all the petals up which is what we're doing in the next step
Step 14: Take the entire flower & squeeze all the petals up. Shape it as desired & then adhere to the center of your larger flower

Step 15: Here's your finished flower! I further decorated my flower by adding drops of Gold Stickles to the center bud
Enjoy--and thanks to all who stop by.


3 comments:
Lovely! Love how you used the watercolor pen with the pearls. Fabulous dahling!! Love that color powder.
Hi.. Thanks for sharing. There is a tutorial on my blog http://crieartezzanato.blogspot.com/2011/09/meu-primeiro-pap-tutorial.html
Val
Hugs
Thanks for the Tutorial. I am going to have to give it a shot. :)
Anna
Post a Comment