
 Hello once again fellow scrappers. Today's brief tutorial is one I've been meaning to post for a long time--let's just say I finally found the time to do so!
  Experimenting with transparencies is something I really like to do. These flowers were inspired by Irene Tan (Scrapperlicious). She loves to experiment with acrylic & transparencies & she's made a couple of transparent flowers that really add a fabulous touch to her pages--this is my take on these see-through flowers. This particular flower that I'm demonstrating can be seen in my 'Love' page.
 You'll need the following supplies: Flower punch and/or flower die cut--I'm using a combination of the medium sized Retro Flower punch by EK Success & the Tattered Flowers die by Tim Holtz--white gel pen, Sharpie Paint marker, transparency or acrylic, decorative scissors.
Step 1: Punch or cut out your flowers. For this flower I used 1 large & 1 small flower from the Tattered Florals die & 2 punched Retro flowers.

Step 2: With your Sharpie Oil Based Paint marker color in the edges of your transparent flowers. You can find these markers at your local Michaels & most office stores have them. If all fails you can always find them online. I've linked to the Amazon page for this example.

Step 3: Take your white gel pen & draw small white dots all along the black border you gave your transparent flowers.

Step 4: This step is optional. With decorative scissors I snip the edges of the retro flowers in order to give them more dimension.

Step 5: Ink the edges of your retro flowers.

Step 6: Bend & fold all the petals upwards on all your flowers as shown in the picture.

Step 7: Curl the tips of the retro flowers downwards with a pencil or thin handle of a brush. I'm using the handle of a thin paint brush here.

Step 8: Pierce a hole in the center of all your flowers & stack them together. You can either glue the layers together or use a brad like I did to hold your flower together. Buttons, pearls, mulberry flowers--anything is an acceptable center for these flowers!
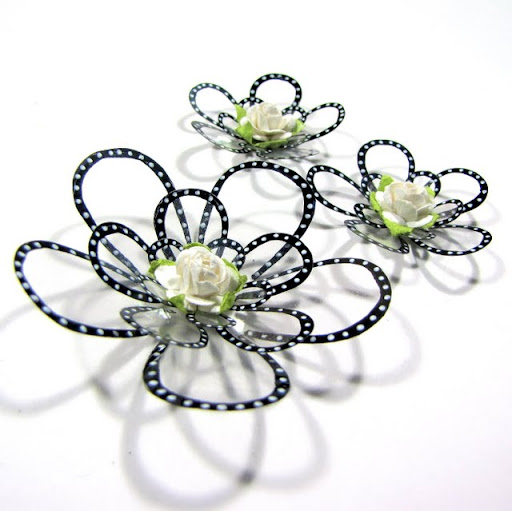 You can also make completely transparent flowers as seen in this picture. These were made with the large, medium & small retro flower punches. I used the same technique as above. I punched the flowers out on transparencies...inked the edges with a Sharpie Paint marker, added the white dots with my white gel pen, stacked the layers & then simply added a small white mulberry rose in the center. These particular flowers I used in my 'Out There' page. Since these Sharpie markers come in all sorts of colors, you can make glass flowers in a variety of colors--you don't have to stick to your basic black & white.
If you want a flower that's still see through but with a bit more color...simply add some alcohol ink & you can even stamp on it as show in this picture. You can find this flower on my 'New York' page. For this flower I alcohol inked it with Butterscotch & a touch of Bronze--then I stamped on it with StazOn. Completely different look but still see through!
Hope you enjoyed this tutorial!
Till my next post...


16 comments:
I love these flowers!! Thanks for the tutorial!!!
TFS. I love these!!!!!!!!!! and even better they look like something I could manage!!!!!!
These are soooo cute! Thanks so much for sharing, that was a GREAT tutorial!
Hi Kay
Thanks for sharing this wonderful tutorial.
-Sony
How beautiful!! thank you so much for sharing!
Hi Kay!! I wanted to stop in and say thank you!! Thank you so much for all the positive comments you leave on my blog....your comments never go unread, just wanted you to know that! I love your lo of you and hubby, very different, but oh so cool. I really love it!!! TFS girl! xoxo Jules:)
Awesome job on the layout and flowers are stunning, I have cut a few out with my Die but never thought to use a pen on them like that. Will definitely be giving that ago. Thanks for the tip!!!
Very awesome! Do you remember waaaaaaaaaay back in the beginning when we were still chatting through sb.com PMs (hahaha)... I had asked you about these flowers and said I could never make a flower?! LOL. This is the flower that inspired me to make the flowers I plan on using on my current project. Will email you the details. Secret CIA stuff. LOL! Awesome tut girl!
Great Tutorial!!! LOVE this flowers, can't wait to make one!! Thanks for sharing!!
these are amazing! TFS this awesome tutorial!!!! off to see where I can sign up to follow your blog!!! :)
thanks for the tips - I'm definitely going to try this if I ever get to do a girly page again :) Thanks for sharing!
Very nice flower I never see something like this. Congrats...
This is just incredible! Love the lightness the acetate gives it. WOW!
Love the flower technique. Read your bio, well written. "Seek & Distroy" especially struck a note with me. You really get paid for that? Heck I can break anything without trying, lol. Just kidding, I know there's a lot more to it than that.
Thanks for sharing, I really enjoyed visiting, and anxious to try the flowers.
Absolutely adore these flowers, can you recommend a brand/source for your favorite transparencies to use? So many options at amazon.com and staples etc I have no idea which work best.
Thanks!
What a nice twist on acetate flowers. I love all of them! The tutorial was wonderful too. Thank you!
Post a Comment