

Good evening fellow scrappers! Today I bring to you a brief & simple tutorial on how to make your own paper flowers. I based these flowers on some Prima ones that I bought at my local scrapbooking store. The packet of 5 flowers cost me $5.00. After staring at them for a few I wondered if I could somehow create my own flowers similar to the ones I bought. This is what I came up with. Mind you, they are not exactly like the Prima ones...after all, I'm not Prima--although I wouldn't mind being them! But I think they're a good replica & these are great for using up any left over scraps! I made these two flowers with left over scraps from my 'Love' page.
To make these flowers it's all about you shaping the petals as much as you can--you'll see what I mean when we go through the steps.
Alright, let's get started...
 Here's your basic list of supplies: Decorative scissors (I used the Scallop decorative scissors by Fiskars), stickles, retro flower punch (small), either a pen or a paint brush in order to shape your flowers (not pictured) & a flower die. For my flowers I used Sizzix Flower Layers.
Step 1: Punch/cut out your flowers. I used 4 retro flowers & 3 sizzix flowers (2 large & 1 medium flower). NOTE: I know in my photo I only show 3 retro flower punches but after making the flower I added one more layer to make it 'fluffier'.

Step 2: With your scissors, cut about 3/4" of an inch towards the center of the flower for each petal. This is to make more defined petals for the flower.
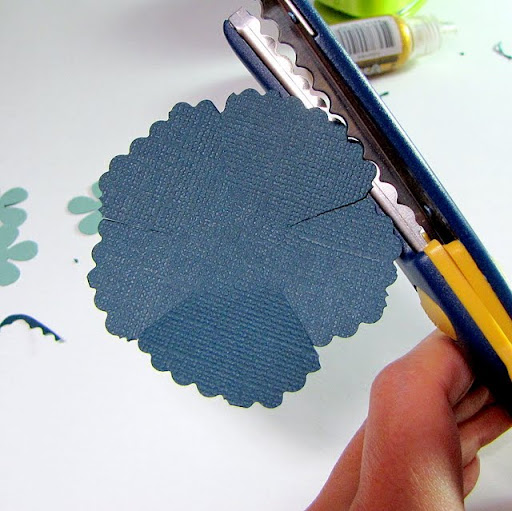
Step 3: Take your decorative scissors & trim the edges of your flowers. You do not have to be perfect. In fact, the more imperfect the more realistic your flower will be.
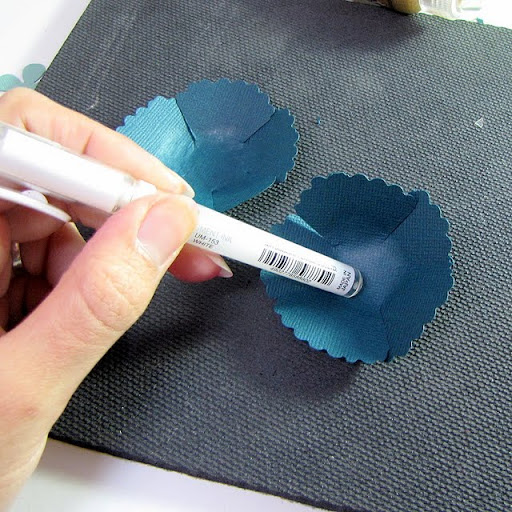
Step 4: Take your pen or paint brush handles (as long as it's a round edge & not too thin) & start shaping your flowers. Just go in a circluar motion while pressing down--you'll start to see the petals of your flowers curl up. NOTE: I used the bottom of my mouse pad as the padding for shaping my flowers. Shape as much as you want--this is what will really give your flowers it's shape.

Step 5: With a thinner handle (I used a thinner paint brush) curl the edges of your petals down.

Step 6: To further shape your flowers pinch the very tips of each petal down with your fingers. Once again, shape, curl & pinch as much as you want. The more you shape the fluffier the flower!

Here are my 3 layers of flowers all pinched, curled & shaped.

Step 7: Layer your flowers. Off-set each layer. NOTE: I added a pop dot beneath my top layer only in order to give this flower more dimension.

Step 8: Now to shape the center flower. Take your thinner brush or pen/pencil & curl the petals up. Only curl 3 of the 4 flowers.

Step 9: Take the remaining retro flower & roll it together between your fingers until you have a small bud as shown in the picture.
Once your bud is shaped--glue it this way. I tend to open it slightly squeeze drops of glue all along the inside petals & then roll it back together again--the petals will stick together since when you roll the flower the inner petals overlap one another.
Excuse my inky pink fingers! Apparently I was inking something pink prior to making this tut. My hands are always inked in different colors it seems...

Step 10: Take one of the 3 curled retro flowers slightly pinch it close as shown in the picture. You will not pinch this one as tightly as the first one. This is only to shape it.

Step 11: Layer your inner flower & glue. Off-set each layer. NOTE: Don't these make cute little flowers just by themselves? Something to think about when you're trying to find that small little flower to fill that one spot on your project!

Step 12: Glue the center flower inside the bigger one & ta-da! You're done.

Step 13: Optional step...take your stickles & add some glitter randomly along the edges of some of your petals.

Here's my flower & the lighter turquoise one next to it is the Prima one. So what do you think? Was my attempt any good?! :-)
I kept shaping & fluffing my flower after the Stickles dried. Remember, the more you shape & pinch together the more dimension your flower will have.
Hope you found this tutorial helpful & thank you to all who stop by!
Till my next post...


8 comments:
I think you did an amazing job!!!Love it!
Great tut Kay!!! We both share a love for making our own....save a little on flowers gives more $$ for papers! That's my take lol! I love the extra steps of the scalloped scissors and the extra pinch after rolling....it is effective :) oh .... and the inky pink fingers....creative badge of honor! :)
Thanks for the great tut! I love working with paper and couldn't have gotten started with out all of you wonderful, sharing bloggers!
Thank you for sharing this amazing tutorial!
wow super cool and you made it look far easier than I first thought... i must add this tut to the flower step for the progressive challenge at sb.com
oh this is phenomenal!!! Fantastic!!! They look so good, totally bookmarking this! Thank you!!!
excellent job! Looks just like the sample! Bravo! I love your centre piece - that is what makes this flower hands down. Thanks for sharing.
Lorena
www.ScrappingCorner.ca
Splendid! I love it and will surely give it a try!! Thanks!!
Post a Comment