PLEASE NOTE: I've moved! Feel free to continue following me via my new blog Embrace Serendipity.

**All tutorials & the majority of the posts from this blog have been moved over to my new blog**


Aug 8, 2012

Carnation Tutorial


Good evening fellow scrappers!  Today I'm bringing you another brief tutorial.  This one is very similar to my 'Ruffled Flower' tutorial but with just a couple of changes.  Primary difference is my use of a different die--which gives this flower it's distinctive look.
For these flowers I'm using Spellbinders Carnation Creations die by Donna Salazar.  These dies seem to be made for carnations since they're named after the flower!  So I figured why not make a carnation flower!?  You can use any size die--it depends on what you need for your project.  For this tutorial I used the second to largest sized 6 petal flower.
Step 1:  You'll need 6 layers for this flower.
Step 2:  If you're making a dark colored carnation you may consider inking it's edges with white since this gives the flower a more realistic resemblance to a carnation flower.  Here I've used Jasmine Mix'd Media Inx also by Donna Salazar.  This ink is basically like a white chalky ink and is perfect for darker colored card stock.
Step 3: These next few steps will seem very familiar since they're basically the same steps used for the ruffled flower.  Take your bottom 3 layers & bend them in half.
Step 4: Then with round nosed pinchers, a skewer, a stylus or even the handle of a thin paint brush--curl the corners of each petal downwards as shown.
Step 5:  Your petals should like like a wide curly 'V' when you curl the ends.
Step 6: On a foam pad or even a mouse pad--anything soft--shape your layers by cupping them with a stylus or any object with a rounded tip.  You do this by pressing down in the center & going around the center of the flower in a circular motion.
Step 7:  Adhere your bottom 3 layers with adhesive--I love my glue gun & use it frequently for my flowers.  It dries fast & holds strong.  Don't forget to alternate your petals.
Step 8:  Take your top 3 layers next.  Shape two of the layers the same way you shaped the bottom 3 layers.  Take your top most layer and snip out one petal as shown.
Step 9:  Close the gap left by removing that one petal by overlapping the two side petals and adhering them together as shown.  You'll end up with a layer that looks like a little cone.
Step 10:  Now shape your top layer just like all the other layers and shape them with your stylus on the foam pad/mouse pad.
Step 11: When done shaping--it's time to adhere your top layers to the bottom layers.  Cup your top 3 layers as shown and adhere them to your bottom layers.  Again...alternate those petals!
Step 12: If you cup your top 3 layers tightly you'll end up with hardly any room in the center.  However, if you end up with a small hole as shown here...well that's what your snipped petal comes in.  Shape that one lonely petal the same way you did the others...the fancy 'V'!
Step 13: Then adhere that one petal right smack dab in the center....ta-da...no more hole!
Here's another take...don't want your typical carnation or want to make a fancier flower--add stamens to the center for a different look.

Thanks for stopping by & I hope you enjoyed this tutorial.  Have a great week!

Aug 2, 2012

Sad Puppy Eyes Layout

Good evening fellow scrappers!  Today's page is one I did for the current challenge going on over at Colors...Stories...Inspiration C.S.I.  I fell in love with their current color challenge and had the perfect picture of my little Toby to scrap.

Here's my Toby giving me his best 'sad puppy eyes'.  He tends to give me these whenever he does something naughty--it's his way of getting away with things. I take one look at his adorable big, brown childlike eyes and I'm done being angry with him!  To me he'll forever be a little 2 year old boy trapped in a furry body.
Here's the color combo & challenge my page is based on.  As I describe my page I'll highlight what I used as my 'Evidence' & what I used as my 'Testimony' for the challenge.
Here's a bit of crazy, random hand stitching.  I actually used a stamp from Kaisercraft's Technologic collection to create this crazy random stitching.  TIP: Stamp any image on vellum or any other kind of transparent paper and use it as a guide for stitching.  That's what I did here. I stamped the image on a piece of vellum and then with my paper piercer used the stamped image as a guide to pierce my holes.  A shout out goes to Ngaire who recently used this same stamp on one of her pages & therefore allowed me to discover this fabulous stamp.
The random 'drips' are also a stamp.  These are part of my 'Evidence' for the C.S.I challenge.  I used brown Staz On to stamp these since I'm stamping on Pink Paislee's Mistables paper.  They're supposed to 'resist' ink...so if you want to stamp on these you need those strong permanent, solvent inks like Staz On.
My brief journaling is my 'Testimony'.  I used a distressed frame to display it. I printed my journaling on a transparency & then adhered it with clear dry glue.
The metal circles are also part of my 'Evidence' as are those light pink organza ribbon flowers.

The random inking I did in the background is a combination of two distress inks: Spun Sugar & Crushed Olive.
A close up of my other cluster of flowers, bits & bobs.  The felt gray flower is by Jolees and the mulberry light teal & green flowers are by Petaloo.  Underneath all of my flowers you'll see some felt branches.  These are by Prima.  I've had these in my stash since forever!  So happy to finally use them.

Thanks to all of you who stop by for a visit!  Have a great weekend...

Jul 24, 2012

The Beginning & Beyond Layout

Good evening fellow scrappers!  Today's page is for one of the latest Bird is the Word (BITW) challenges.  The challenge is to use the word 'Beyond'.  I've incorporated it as part of my title.

This photo was taken on our first wedding anniversary.  We were married in the Fall which is both our favorite season & also makes for some colorful scrapbook pages!  Since this was our first year married I titled it 'The Beginning & Beyond' which is how I felt at the moment.  It was barely the beginning of our lives together and we were both anticipating what was beyond this first year together.
I manually tore a piece of corrugated cardboard and went mixed media crazy with it!  I gave the corrugated cardboard lots of texture by combining a bit of molding paste, mists in shades of browns, oranges & reds and randomly heat embossing with some gold embossing powder by Stampendous and Fake Bake Enamelz embossing powder by Shimmerz.
I've once again stored my journaling in the form of a scroll. If interested on how I went about creating this scroll--find the tutorial for it here.  This has quickly become my favorite way of storing lengthy journaling.  Instead of hiding my journaling behind my page like I used to--my journaling is now a unique embellishment to my page!
The large chipboard tree is by Dusty Attic.  Just like the background I used a variety of mixed media to give it texture.  It was first painted with dark brown acrylic paint then randomly heat embossed with a bit of mahogany distress embossing powder.  With my finger I spread a bit of Vintage Photo Distress Stickles randomly on the branches and finally with my finger again I added a bit of Martha Stewart brown leaf glitter here n' there on several of the branches.
Finally my cluster of 'Autumn' themed flowers, bits & bobbits.  Many of these items are from my own stash.  The large brown fabric flower is actually a left over from a kit I bought from the Funtoolas Etsy shop.

The transparent butterfly resting on the Prima nest is a butterfly from my small Etsy shop--you can find this butterfly & many more in my shop here.  I tucked a bit of tulle underneath my large brown fabric flower & the bright yellow bird is also from my stash.

Thanks to all of you who stop by for a visit!  Have a great rest of the week!

Jul 15, 2012

Withstood the Test of Time Layout

Hello once again fellow scrappers! I'm so happy to present my debut DT layout for Once Upon A Sketch (OUAS)!! I was very happy with this month's challenge because it's a theme that once received; I knew exactly how I was going to approach it. As soon as I saw that the theme was 'Friends' there was one person that instantly popped into my head--and once inspiration strikes I do not dare argue with it!

 I've known my friend Mellisa going on 20 years now. We met freshman year in high school. She'll be one of the first ones to tell you that I was FOREVER with a camera in my hand--well now, years later, this habit of mine is paying off because I actually have a photo of us when we first met back in 1992. That would be the picture on the left. So having that one photo allowed me to show us together 20 years apart. The photo on the right was taken this year, 2012. I loved being able to show the 20 years of friendship by having then & now photos. This also helped me in determining the title for this page which I felt was quite appropriate.
Here's the sketch provided to us by Nadia that I based my page on.  I enjoyed working with this sketch & found that it could be interpreted in many ways.

I also used papers & a few embellies from May's C'est Magnifique kit titled "Wings of Imagination".
The large chipboard clock is by Dusty Attic.  I kept the texture on this chippie simple.  All I did was dip the chippie into some embossing ink & then heat embossed it with Star Dust embossing powder by Stampendous.

Here you can also see a bit of the hand stitching I did.  I created a layer by simply stitching a large, long rectangle in the background.
The birds are by Glitz Design.  I hand cut them out of the paper they came on.  The pearl flourish is by Prima.  I kept the pearl flourish on the clear packaging it came on.  This made it easy for me to adhere it on top of the twine & chipboard clock.
I've seen several scrappers utilize scrolls of paper as embellies.  I figured I'd give it a shot.  I curled several pieces of leftover scraps, adhered them closed and then tied some twine around them.  Amongst all the rolled up paper I adhered a brown glass vial and tied a gold charm clock to it.  You can see my journaling sticking out of the glass vial.  I printed my journaling on vellum and rolled it up very tight in order to squeeze it into my glass vial.  I thought this would be the perfect holding spot for my journaling!  You can see the bottle's cork adhered a little bit to the right of it.

Journaling reads as follows:  We met in pre-Algebra class freshman year of high school.  The fact that we met in pre-Algebra class is a joke we carry till today--that both of us are just so very awful in math that neither of us even made it to regular Alegebra--but 'pre' Algebra instead.  I don't remember who talked to whom first; but at this point it doesn't matter.  Like many friends do we did lose touch for a few years but like true friends, we found each other once again & this time it's for keeps.
We've seen each other grow, mature, graduate from college, begin our careers, go from girls to women.  We've seen each other at our best & at our worst.  Even though we've known each other for so long--I like to think that this is only the beginning & that there will be many more years of friendship for us to share & enjoy.
This one is for you, dear friend.  
A resin bird house by Prima.  The mulberry flowers are from my own stash.
The word 'Time' from my title was raw cardboard.  In order to add some interest to it I covered each letter in Glossy Accents and then poured a bit of Gala Glitz Blue by Art Glitter on it.  This is a sort of vintage glass glitter.  As you can see it adds a lot of texture.
I inserted a yellow mulberry paper flower in the center of my blue sheer bow.  From the paper flower I have both a pin by Prima & a couple of charms hanging from it.  I'm still sticking to my New Year's resolution of using as much ribbon/strings on my pages as I can!  I have such a large stash of these & I really need to use them up.

Make sure you head on over to the OUAS blog and check out the other DT's amazing interpretation of this challenge. Also do play along--especially if inspiration strikes! A big thanks to all of you who stop by for a visit!

Jul 3, 2012

Ruffled Flower Tutorial

Hello once again fellow bloggers & scrappers! Today's post is a tutorial on how to make these really cute two-tone ruffled flowers.

First of all I'd like to give a big thank you to Anna Fearer who inspired me to take a new look at the many punches & dies I have collecting dust in my stash. Anna has a gorgeous Etsy shop full of beautiful handmade flowers. She also has a very inspiring blog where she shares all her lovely creations plus a couple of tutorials on how she goes about making a few of her flowers. It was after watching one of these tutorials that I was motivated to try my own little creation & this was the result. Make sure you visit Anna's Etsy shop More Paper Than Shoes & her blog for lots of handmade flower inspiration.

So for these particular flowers I ended up using the Flower Layers Die by Sizzix--a die that I've had in my stash for years and never really used.

So let's get started!
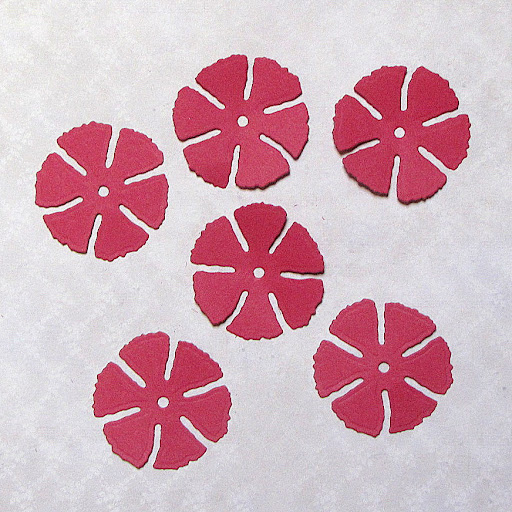
Step 1: I've used a total of 6 layers for my flower.  I used the second from the largest sized flower.  You can make solid colored flowers, two-tone flowers (my fave) or even a cascade colored flower!  This one will be a cascade flower.

 Step 2: Take 3 of the 6 layers that you plan on using for the bottom part of the flower and snip about 1" in between each petal.
Step 3: Take each petal & with your fingers fold them in half.  They don't have to be perfect.
Step 4:  With a pair of round long nose pliars--take the corner of each petal & curl them down.  If you don't have long nose pliars, a thin skewer, a skinny neck stylus or even a thin paint brush handle can be used to curl the petals.
Step 5:  This is what the edges of your petals should look like once you bend them in the middle & curl the edges down.  I like to think that the petals look like an arch or a very wide letter 'V'.
Step 6: On a foam pad or even a mouse pad--anything soft--shape your layers by cupping them with a stylus or any round object.
Step 7: With strong adhesive (I personally use hot glue) adhere your three bottom petals.  Try to alternate your petals.

This is what your three bottom layers should look like when done.
Step 8: Now shape the 3 top layers in the same manner you shaped the bottom 3 layers.  Only difference is to cut into each petal a little bit deeper than you did with the bottom layers without going all the way to the center.

Take the layer that will be your top most layer.  Punch a hole in the center big enough to tuck a few folded stamens.  Then cup the petal around the stamens as shown.  Add a bit of glue around the petals in order to keep the petals 'hugging' the stamens.  This will be the center of your flower.
Step 9:  Here's what your top 3 layers should look like.
Step 10: Start shaping your top layers now in order to adhere them.  Cup them as shown, add glue to their bottoms & adhere them to your bottom layers.  Again try to alternate those petals.  Finish it up by adhering the center layer.
Step 11:  Here's your finished flower!  Once complete, shape your flower a bit more with your round nose shaped pliars.  When adhering the layers, the petals my lose their curl a bit...so at this point you can re-add a bit of curl to each petal.
Here's an example of a solid ruffled flower. You can see a couple of more two-tone flowers in the background.

Take note that these flowers have a lot of volume to them--meaning they stand pretty tall.  So they're not meant for your traditional scrapbook pages that go into albums.

Hope you found this tutorial of some help & that you take a look at your punches & dies in a whole new way. Can't tell you how happy I am that I now found a very good use for that old Sizzix die I had in my stash with literally an inch of dust on it! Have a great rest of the week!