PLEASE NOTE: I've moved! Feel free to continue following me via my new blog Embrace Serendipity.

**All tutorials & the majority of the posts from this blog have been moved over to my new blog**


Mar 27, 2013

Thinking of You Criss Cross Card Tutorial

 Good morning fellow scrappers!  Hmmmm, seems like almost a whole month has flown by & I've been a bit quiet.  Well, you can blame work for that.  I've been a bit swamped since I went back.  I've made it a point to keep my sanity by taking the time to scrap here n' there--I just haven't had the chance to post any of it!  So, to start myself off here's a DT card I've made for Authentique.  I've used their lovely papers from the 'Remembrance' collection. I've decided to go with a non-traditional card & opted for what is called a 'criss cross' card. 

'Remembrance' is one of Authentique's petite collections full of beautiful papers in shades of deep purple & olive greens with elegant patterns and sentiments of sympathy, thoughtfulness, and good memories.  These papers can be used for sympathy cards, to honor memories of loved ones who has since left us or to pay tribute to a dear family member or friend.

There are several tutorials and how to's on the internet on how you can make your own criss cross card.  I simply decided to add to this collection of tutorials with my own version.  What I like about the criss cross card is that it's essentially one large pocket that you can embellish as desired with a sentiment that easily slides in & out of the card.  It's not a complex card to make if you wish to go with a slightly different sort of card.


Here is what the inside sentiment of the card looks like.

Following are a couple of close ups.


Now onto the tutorial...

Step 1: You'll need 1 piece of solid colored card stock cut in 1/2. A 5 3/4" x 5 3/4" piece of contrasting paper & two 5 1/2" x 5 1/2" pieces of coordinating paper.

Step 2: Score the two 12" x 6" pieces of card stock in half. With a trimmer, scissors or craft knife you will then need to cut at a diagonal from one corner of the card stock to the bottom corner of the center fold. TIP: The photo came out a bit too bright to see this, but with a pencil & a ruler I lightly draw a line marking where I intend to cut. This serves as a guide so that I don't cut way off.

You will repeat this step on the other piece of 12" x 6" card stock. NOTE: when you cut the second piece of card stock make sure you do so on the opposite side so that when you join the two pieces of card stock the two middle sections will overlap to the form the base of your card.

Step 3: When you adhere the two 12"x6" pieces of card stock--this is what they should look like.

Step 4: Cut all of the remaining pieces of paper diagonally as shown. Once again I first drew a line lightly as my guide with a pencil & ruler prior to cutting. I don't know about most of you but I'm very lopsided! I can never just cut away without some kind of guide!

Step 5: Adhere the patterned paper to the contrasting piece of paper. You will have the other halves of the patterned paper left over. Keep these for future projects. NOTE: If you do not wish to have leftovers or if you want your card to have just one design--simply use one piece of 5 1/2" x 5 1/2" patterned paper cut in half diagonally.

Step 6: Take the two triangles and adhere them to the base of the card as shown. At this point you have your criss cross card pretty much done. All that's left is to glue it closed & decorate it!

Step 7: With two sided tape (or glue with a fine tip) place one strip on the base of the card at the very bottom to adhere the first flap. Then take a second strip of tape & place it on top of the first flap to adhere the second flap as shown here.

Step 8: For the inside of the card you'll need 1 piece of patterned or solid colored paper (whichever works best for your project) sized 5 3/4" wide by 5 1/2" high.  This next step is optional--to make the tabs with the brads seen on my card simply take a 1" circle punch & punch out 2 circles--fold them in half, pierce a small hole into one half of the circle, attach the brad & finally adhere to the card.

Step 9: Here's your finished card. Now just embellish away!

Hope this tutorial will inspire some of you to create a criss cross card for you next project.  Thanks for stopping by & enjoy the rest of the week

Mar 1, 2013

You Color My World Layout & Challenge

Good morning fellow scrappers! It's actually my turn to host my very first challenge over at Berry71Bleu!  This is the first time I host any kind of challenge--so I'm quite excited & a bit nervous...

After a bit of deliberation, I decided to go with a 'You Color My World' theme.  The concept is to create a project based on a person(s) that adds 'color' to your world--that just brightens your day.  That one person(s) that just gives your life meaning.  It can be more than one person & it can even be a pet!  I have my own fur baby--so I'm very much aware of how much joy a pet can bring into someone's life.  So pets are included in this theme.  The challenge is to use paint in your project.  You can use paint in any shape or form...splash it onto your background, use it to color your embellishments such as chipboard or flowers--the possibilities are many, just let your creativity be your guide.
I provided this photo collage as inspiration for the challenge.  The projects don't necessarily have to have many colors or bright colors--the photos are more for inspiration since they're lively, happy & joyful.

At first I was going to scrap my newborn son--what can add more happiness & joy to someone's life than their first child right?  Then I thought...hmmm, can't leave Toby my fur baby out--he taught me the meaning of unconditional love!  Then after more thought I realized that I wouldn't have Toby or my son if it weren't for my husband.  So I based the page on him--the beginning of it all & the reason as to why I have the family that I'm part of today.

I'm a cautious person & take my time to make any life changing decisions.  If it weren't for my husband giving me those much needed nudges neither Toby or my newborn son would be here today.  How grateful I am today that he gave me those nudges--my two boys complete my world & are my two little rays of sunshine.  So this project is dedicated to my husband...with much love!

 The title was printed on a transparency, cut out & adhered with clear dry glue.  The light orange polka dots were made with a stencil provided by this month's challenge sponsor DecoArt.

The border seen here was made with a punch by Martha Stewart.  The large light brown flower is by Manor House Creations & the mulberry orange & yellow flowers are from I Am Roses & Wild Orchid Crafts.
In the upper corner of this screen shot you'll notice my usual scroll which holds my journaling.  Here I provided my husband with a heartfelt message.  You can find a tutorial on how I make these journaling scrolls here if interested.
All of the chipboard cogs seen here are by Dusty Attic.  To give them texture, they were all first primed with gesso.  Once dry, I colored them with blue frosted paint also sponsored by DecoArt.  After this layer dried I finished it off by using a bit of DecoArt purple & blue twinkle paint.   I especially liked working with the twinkle paint--as you can see, this paint gave my chipboard cogs a nice shimmery & glittery final touch.

The splatters seen in the background were made with the 'Splats' stamp set by Recollections.
The film strip is by Tim Holtz & all these really cute wooden tags & the wooden window shutter seen underneath the Manor House flower is by a shop found in Zibbet called SaCrafters.
Love my bright blue cogs!  :-)
I included these two paint brushes to be symbolic of having my husband 'color' my world.  These were actually the brushes I used to paint my chipboard cogs.  I just cleaned them a bit & adhered them to my page.

Make sure you head on over to the Berry71Bleu blog & play along!  You have until the end of March to play & this month's sponsor DecoArt has provided us with some of their fabulous products as the prize to the lucky winners!  Looking forward to seeing all of your lovely works of art.

Feb 22, 2013

My Sweet Little Lamb Layout


Good evening fellow scrappers!  Today I bring to you my debut page for Authentique!  I was very much looking forward to working with their wonderful products--Authentique is known for their thick heavy weight paper & I utilized this characteristic to create some very simple handmade embellishments in the form of paper scrolls.  Before I go on any further though--just a bit about the theme of this page.

This would be my newborn son at approximately 1 month & 1/2 of age wearing his very cute lil' blue elf hat.  These photos were taken in December of 2012 & I remember that day vividly.  He was actually quite the tiny cranky pants that day because we decided to take pictures of him too close to his scheduled dinner time.  You can see the poutiness creeping up on his face--needless to say we kept this photo shoot short--but did manage to take a few pics--this being one of them.

For this page I've used Authentique's Hope Collection.  This collection is geared towards Easter but I wanted to show that these papers can be used for other themes as well.  In fact, they work perfectly for masculine/boy themed pages.  I chose bold embellishments that would bring out the primary colors of the Hope papers.

The large silk light yellow flower shown here is from Funtoolas Etsy shop.  There are many more lovely fabric flowers in this shop along with a few other crafting embellishments in this shop if interested.

I found this quote online & found it to go along nicely with my page.  I found it to be so very true & printed the quote directly onto my photo.

The banners are cutouts from a Hambly Print overlay...the resin domino pieces are embellies from my stash--if I remember correctly, I found them in the clearance bin at my local Michaels--they're actually considered beads since they have holes in them & you can run string through.  Personally, I saw them as really cute embellishments for scrappy projects!


Sometimes, the best embellishments are the paper themselves & with the simplest of techniques.   Authentique's paper has a perfect thick texture to them in order to create sturdy paper scrolls.  I've taken several pieces from the Hope collection & have rolled them to create random scrolls onto my page.  These little rolls of paper make for an interesting visual embellishment on your layouts & are also a great way to use up leftover scraps.  I've spread several of these scrolls throughout my page & have made them in different sizes.  When adhering these paper scrolls, try not to adhere them in any particular order--just randomly adhere them & you'll notice that this looks more visually appealing to the eye.

Take a closer look at the third scroll from the bottom. This scroll also happens to be my journaling.  Storing journaling on scrolls has become almost a trademark on my pages.  TIP: This is a great way to store large journaling or stories without taking too much space on your pages.  I typed up my journaling on my computer & printed it onto vellum--then I rolled it up & adhered it to my page with a leftover strip of scrap paper that I use to keep my scroll in place.

If interested on how I go about making these scrolls--feel free to check out the tutorial here.  


Isn't this the cutest fuzzy teddy bear embellishment?  I bought several of these in different colors.  I find them to be the perfect embellishment for baby themed pages!

These are the my latest butterflies & will be added to my small Etsy shop very soon.  To see more butterfly embellishments--feel free to visit my shop here.

More paper scrolls, strategically placed onto the background of my layout.


The majority of the embellishments used on this page are from Hope's Details & Statements sticker elements. If your scrap approach is anything like mine, you tend to arrange & re-arrange the many embellishments on your page at least 101 times!  So being able to freely move sticker elements around without worrying about them sticking to your page adds flexibility during your page design.  TIP: Something I tend to do with sticker elements is to stick them onto transparencies.  This way I can cut them out & then adhere them anywhere onto my page without having to worry about making a mistake as to where I place my stickers.  If you wish to eliminate an extra step, Authentique's DT Coordinator, Emily gave me yet another tip.  Sprinkle a bit of baby powder to the back of the stickers to remove the stickiness.  Either way will work!

So all of the stickers seen on this page have been adhered to transparencies first, cut out & then adhered with your basic glue or pop dots to my page in order to give them more dimension.

As always, many thanks for those of you who stop by for a visit.  Enjoy the rest of your weekend!


Feb 19, 2013

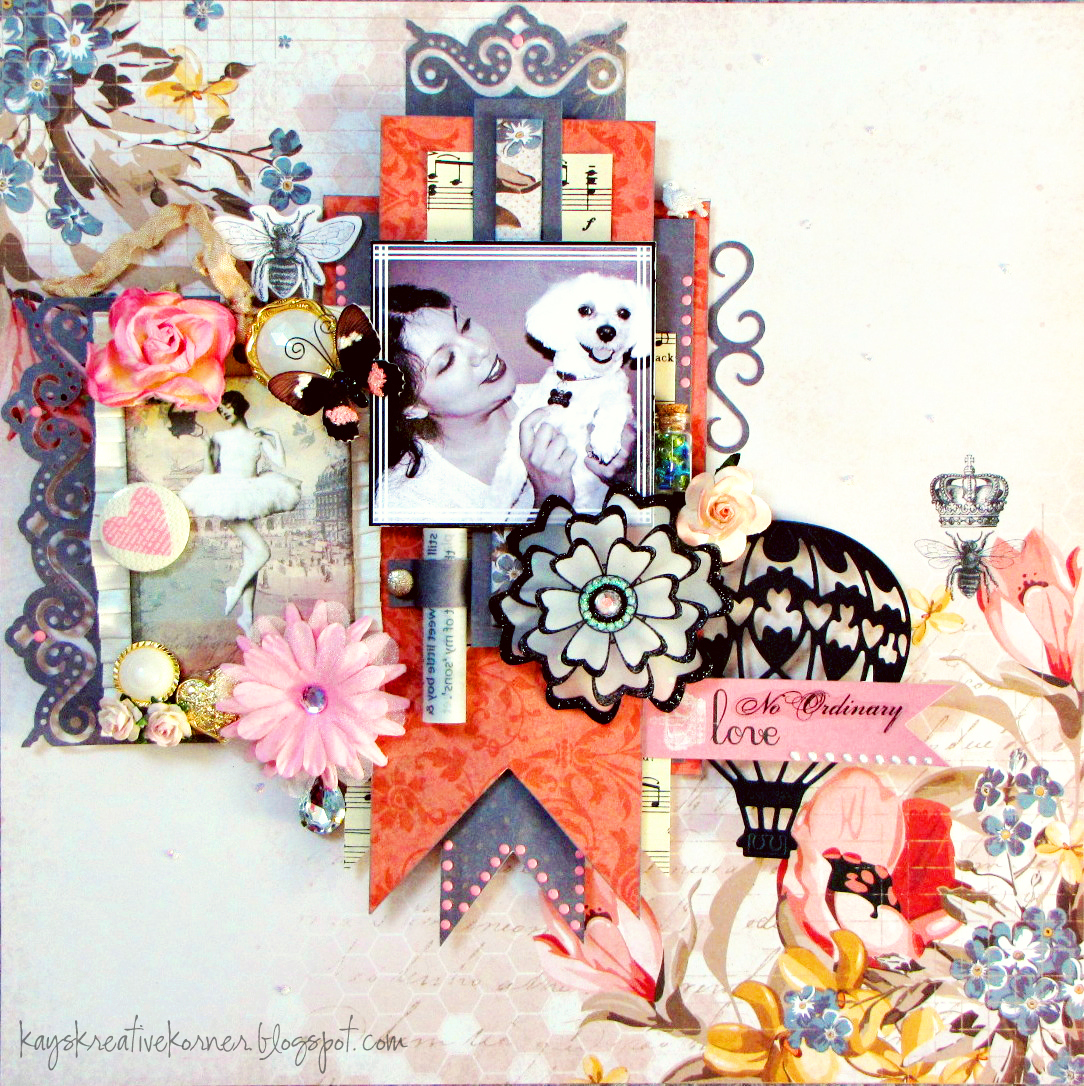
No Ordinary Love Layout


Hello once again fellow scrappers!  Today I'm presenting my interpretation of Anupama's 'White Space' challenge going on over at Berry71Bleu.   'White Space' is defined as a portion of a page left unmarked in visual arts.

I decided to leave two sections of my page as white space--the upper right hand corner & lower left hand corner.

I've used papers & a few embellishments from Kaisercraft's Forget Me Not collection which coordinated quite well with Marivic's Berry71Bleu tag.

This would be me with my fur baby Toby.  I decided that Toby was due for a page.  Even though my first son has arrived to our home --I still see Toby as my eldest 'son'.  :-)  Yes, I know he's a dog--but to me he's simply a child trapped in a pup's body.  He taught me the meaning of unconditional love & he's still a very important member of the family.

It took Toby about 2 weeks for him to get used to this tiny little human in the house.  He's been an only child for five years & had never seen a baby.  So it was a big adjustment for him.  After 3 1/2 months, Toby has pretty much adopted his less furry younger brother & protects him as if he were his own.

What I have with Toby is 'No Ordinary Love'--hence the title.  It's the kind of unique love that can only be shared between man & his best friend or in this case, between a girl & her little fur baby.


I did much layering on this layout with foam dots & pop dots in between several of the layers in order to give my page a bit of dimension.


Of what has become a sort of tradition with my pages--here's my journaling stored in the form of a scroll.  As mentioned in previous posts--I love attaching lengthy journaling and/or story telling to my pages.  I used to always store them behind my pages because since they were so long--they would take up a lot of room on my layout.  However, ever since I started storing my journaling in the form of a scroll--it's become almost a habit of mine & a trademark on my pages.  Plus they also make for a really cute & unique type of embellishment!

If interested on how I go about making these scrolls--feel free to read up on a tutorial I made for them here.

I love this photo that my husband took of me & Toby.  As usual, he looks as if he's smiling at the camera!  Right next to my photo is a mini glass vial that I filled with seed beads from my stash.


This is my latest fave die!  I love, love, love this hot air balloon die by La-La Land Crafts!  Isn't it so very cute!  It adds a brilliant touch to my layouts.


Finally, here's a closeup of Marivic's Berry71Bleu tag.  These tags are like instant embellishments.  You don't have to dig around your stash for too many embellishments if you have one of these tags handy.  Just adhere them to your page & you're pretty much done!  You can find more of Marivic's tags in her Etsy shop here.

As always, a big thanks for those of you who stop by for a visit.  Make sure to play along with this month's Berry71Bleu WhiteSpace challenge if you can!  There are some fabulous prizes up for grabs by UHK Gallery & 7 Dots Studio!

Enjoy the rest of the week!

Feb 15, 2013

Your Everything Layout


Hello once again fellow scrappers! Happy belated Valentine's Day to you all. I hope many of you gave & received much TLC to all your loved ones yesterday & every day! Why just keep it to just one day right? Spread the love daily is what I say! :-) On that note--this page is a bit on the romantic side.

This would be me & my husband on our wedding day.  I titled this layout 'Your Everything' which is the song that was playing when this photo was taken.  My husband requested the DJ to play this song by Keith Urban & then proceeded to dance & sing it to me.  It came as a bit of a surprise since I didn't know he was going to ask for this special request.  This would be my husband at his best!  :-)

This page was made with two products that are part of Clear Scraps newest releases--the Hearts Acrylic Border & the 6" Chicken Wire mascil.


This large sheer organza ribbon is actually two bows that I hot glued together in the form of a cross.  So it looks fancier than what it really is.

Underneath it is a Prima vine that I tore apart & adhered strategically underneath it.


All papers & the stamped images are by My Mind's Eye (Follow Your Heart - Be Happy Collection). Here you can see the large floral stamped image and the honeycomb image that I randomly stamped in the bottom right hand corner.


Here's a closeup of the Chicken Wire mascil. I placed the mascil in the corners of my page & spritzed Graphite Glimmer Mist & just a hint of My Bleeding Heart Coloringz by Shimmerz over it. Next I removed my mask & LISTO! Instant decorative & shimmery background!

The large leaf flourish die is the Mega Fanciful Flourish by Cheery Lynn Designs.  I further decorated the flourish die by adding dots of acrylic paint to the ends of the swirls.

You can also see in this close up that I randomly added dots of Diamond Stickles to my background.  Adding dots of light colored shimmer adds a nice touch to your background.


Here's a closeup of the Hearts Acrylic Border.  To give this border it's texture--I first highlighted the edges with a black Sharpie Oil Based Paint Pen--then I colored the border with Red Pepper & Silver alcohol inks.  Finally I stamped the word 'love.' with black Staz On ink to the hearts.  TIP: Always remember to use solvent inks & permanent markers with acrylic.  Using any other kind of inks or markers will cause your work to smear.


The paper heart border was made with Martha Stewart's Lattice Heart deep edge punch.  I accentuated the design with dots of pink acrylic paint.


These butterflies are a fairly new addition to my Etsy shop.  They are called 'Angelus' & like all the butterflies in my shop come in sets of  3.  Although they can be made in any size!  If interested in these or any other kind of butterflies--feel free to visit my shop.

A big thanks to all of you who stopped by for a visit.  An even bigger thanks for those of you who leave a comment.  I always appreciate the gesture!

Hope you all had a wonderful Valentine's--enjoy the rest of the weekend!

Feb 14, 2013

Berry71Bleu Love Blog Hop!!

Welcome to the Berry71Bleu Love Blog Hop!!
Happy Valentines Day!  If you have arrived here from Debbie's blog then you're right on target.  If not, please make your way to Debbie's blog & then come on right back here.  
Here's the blog hop order:

Kay---> you are here

Today is a day dedicated to love . . . not just the love for that special someone in your life but all kinds of love.  Love for your family, friends, pets & yes even the love you have for where you live!  Here at Berry71Bleu we decided to share a bit about ourselves consisting primarily of where we each live & why we love to call it 'home'.This should be interesting since we have ladies from the USA, Poland, India and Puerto Rico.

So let's begin...I live in Northern New Jersey just 20 minutes away from New York City--the city that never sleeps!  Having this amazing city so very close by but not being right in the center of it is just one of the main reasons that makes New Jersey my kind of place to live!  We also have a good number of near by beaches towards the South of Jersey.  Many of them were hit hard by hurricane Sandy--but they have since been re-building & it looks like the Jersey Shore will end up better than ever.  For those that like to gamble there's Atlantic City about 3 hours away or if you want just a simple quiet getaway there's Cape May at the very bottom of New Jersey filled with historic bed & breakfasts & Victorian architecture.   
For this post I will concentrate on New York--my absolute favorite place & what I love the most!
The views!  I have to say that New York has some amazing views--both within the city and from afar.  This photo was taken from the top of the Empire State Building.  That would be the Chrysler Building & just a few of the many, many skyscrapers & buildings that make up NYC.
It almost looks like a puzzle doesn't it?  Or a miniature toy city where you can move the skyscrapers around with your hands!  Yep, that's how tiny the buildings look from the top of the Empire.  I've been to the Empire at all times of the day--morning, late afternoon & of course at night.  At all times of the day, the views are magnificent.  I can sit at the top of the Empire for hours & hours...
One of my absolute fave times of years to visit New York is Christmas...oh I love it!  Here is Rockefeller Center with the infamous Rockefeller Tree in the background.  As you can see, lights are everywhere at this time of the year.
My view from New Jersey.  This is one of the most famous spots from NJ to see this wonderful city from the outside.  This view is constantly visited and is even more spectacular at night.  This is of course the Empire & I even caught one of the many ferries that travel between NY & NJ in this photo.  Just another way to get into the city besides a bus or train.
Radio City Music Hall during Christmas.  If you're just not feeling the holiday spirit--hop on the nearest train & head into the city.  New York will put you into the Christmas spirit in no time.
Times Square at it's finest!  I took this from the 5th floor of an IMAX movie theater when I went to see the final Harry Potter movie.  (Yes folks--I'm a total Potterhead!)  Times Square is always hustling & bustling with so many things happening at the same time.  Sometimes I just like to stand in the very middle and just take it all in.
People, people, people & yes, more people.  Times Square can get very, very packed.
This post wouldn't be complete without Lady Liberty.  She's magnificent & means so very much to us.  I've had the privilege to climb all the way up to her crown.  Some 300+ steps via a very cramped spiral staircase--but worth every step.
Of course Times Square isn't complete without it's many Broadway shows.  Here's the Lion King theater.  We went in April of 2010 & thoroughly enjoyed it.
My husband!  LOL...this is what he usually looks like when I drag him into NYC.  Unlike me, he's a country boy & prefers quiet farms & lots of trees instead of this concrete jungle.

He tends to look like a tourist when he goes into NY...a bit lost & amazed--the back pack doesn't help!  :-)

Let's hear it for the city that never sleeps!  I enjoyed sharing a little bit of what I call 'my infamous backyard' & to show my favorite thing about living in New Jersey.

Now for the prizes & the rules...

We have a fabulous prize for one lucky person who completes all of the rules of the blog hop,  a 7 Dots Studio collection, Domestic Goddess:

To qualify for this month's FABULOUS Prize you must complete the following:

* Visit each blog listed on the hop to see what each designer has to share with you and leave a comment.
* Each designer's blog hop post will feature a word to make up a secret sentence, 
collect these words along the way.
* You must become a FOLLOWER of each blog along the way
 and LIKE us on our Facebook Page!
* For your last stop on our Blog Hop return here to the Berry71Bleu Blog.
Leave a comment letting us know you have
completed the hop.
(Please do NOT include the secret sentence in your comments.)
Now comes the hard part, you must take the words you have collected along the blog hop and  unscramble them to create a sentenence.

*Email the secret sentence to Debbie: mdjsburns@aol.com
The Blog Hop ends Sunday, February 17th at Midnight CST


My word is: LIFE  

Your next stop is Marilyn's blog!  Enjoy the rest of the hop & best of luck to you all...