PLEASE NOTE: I've moved! Feel free to continue following me via my new blog Embrace Serendipity.

**All tutorials & the majority of the posts from this blog have been moved over to my new blog**


Aug 24, 2011

Priceless Layout


Today's page is one based on my wedding. This is one of my favorite pictures from that special day. The angle the picture was taken was just right in my opinion--it's just one of those photos that always makes me smile.

This is a layout I've done for Stamp Enjoy. I primarily used papers from Kaisercraft's Chapter One collection. I did some stitching, stamping, misting, lacing & distressing on this page. I used Martha Stewart's Wildflowers punch for the border in the upper part of my page.

A closeup of the chipboard border I used for the lacing. This chippie is by Dusty Attic. I first painted the chippie with black acrylic paint. Once dry I inked it with embossing powder & heat embossed it with Kaleidoscope Transparent embossing powder by Stampendous. I found this particular embossing powder at my local Michaels. I absolutely love the effect this particular embossing powder gives as shown in this photo! In person, it adds a wonderful touch to the page.

A closeup of the double lacing. I have a brief tutorial on this lacing found in my blog. If interested, you can find the tutorial for this double lacing here.

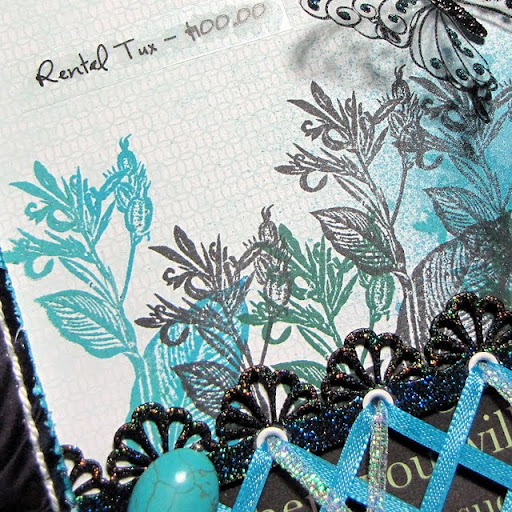
A closeup of the stamping. This stamp is by Stamp Enjoy & is called Balisier. I stamped it by using three different shades of inks. The black was primarily to give the flower a 'shadow' effect.

A closeup of the flowers & stick pin. I made the stick pin myself. It was my very first stick pin & I'm really happy how it came out!

This is a closeup of the clear butterfly. I currently have this butterfly available in my Etsy shop. If interested, please feel free to visit my small shop. You can also see a bit of my hand stitching in this closeup.

Finally, a closeup of the other Dusty Attic corner chippie I used & of the acrylic flower. The Dusty Attic chippie was first painted with white acrylic paint & then heat embossed with Star Dust embossing powder by Stampendous--also found in my local Michaels.

The acrylic flower I found in an Etsy shop called FrogFeathers.

You can also see that I further decorated the floral design of the punch by adding rhinestones & Stickles in the center of the flowers.

Thanks to all of you who stop by--I very much appreciate the visit!

Double Lacing Tutorial


Hello once again fellow scrappers! Today I'll be showing how I went about doing the double lacing seen in my 'Priceless' page. I call it 'double lacing' because it uses two ribbon strands instead of just one.

Besides ribbon, you can also use twine or even tulle to give it a softer look. I got the lacing bug from my scrap buddy Natasha who religiously uses it on her pages. I've taken her love of lacing & have added my own small twists to it--this is one of them.

Both strands can be the same color or different. I find that having strands in different colors looks better--but the choice is yours. You can also mix & match what you use for the lacing such as one strand of ribbon & one strand of twine.

Let's get started...

Step 1: Put both ribbon strands together & pull both ends through the first holes.

Step 2: Take the ribbon that will be your predominant strand; skip one set of eyelets, cross the ends over each other & insert them into the eyelets as shown in the picture.

Step 3: Take your second ribbon; do not skip any set of eyelets, cross the ends over each other & feed the ends into the eyelets directly below.

Step 4: Take the ends of your predominant ribbon (which should now be behind your page) & feed the ends into the eyelets directly above. In the photo this next step is indicated by the red arrows.

Step 5: At this point you're back at the beginning. Take your predominant strands, skip a set of eyelets cross the ends over each other & insert them into the eyelets as shown.

Step 6: Take your second ribbon (which should still be behind your page at this point) & feed the ends out through the eyelets directly below. In the photo this next step is indicated by the red arrows.

Step 7: Criss cross the ends; do not skip any eyelets & feed the ends into the eyelets directly below.

Step 8: Repeat Step 4.

Step 9: Skip one set of eyelets, cross the ends over each other & insert them into the eyelets as shown in the picture.

Keep going until you're done with your lacing. Oh & one more tip before I forget...try to have an even set of holes to have a complete set of double laces.

This is what the back should look like. Ensure your ribbon is not twisted--try to keep them nice & straight.

Hope this tutorial inspires some of you to try some lacing on your next project...

Aug 2, 2011

Little Guitar Boy ATC Tag


Hello once again fellow scrappers. Today's project is an ATC tag that I made for Stamp Enjoy.
I made the stamp by utilizing the same technique used in the faux metal poinsettia seen in my 'The Christmas Money Shot' layout. You can find the tutorial for this faux metal technique here. The only difference is that there's no acrylic involved for this ATC tag.

A close up of the very cute stamp. This little guy is by Stamp Enjoy & is called Liam Guitare. I colored him in with Prismacolor markers & then further decorated him by adding Crystal Stickles on his hat, shirt & pants. The 'Cool' stamp is also by Stamp Enjoy & was stamped on a transparency & adhered with clear glue dots.

Finally, a close up of some of the embellies I used. The buttons are by Websters Pages & the gold metal flower I bought from an Etsy shop called MyWing588.

Thanks to all of you who stop by! Am attempting to enjoy this very hot summer regardless of the humidity (yuck) and the loads of work my job is piling on me--let's just say that I am looking forward to Fall! :-)

Till my next post...


Jul 13, 2011

Artist Layout


Good evening once again fellow scrappers & bloggers! Today's post is one based on yours truly. That's me at a very young age doing what I've always loved to do...draw! Gotta love the big ol' bow in my hair & the so very 70's wall paper! :-)

As usual, I did an overload of stamping on this page. The entire background is stamped including the large flourish scroll border you see at the bottom. This is a DT page for Stamp Enjoy. I've also used stamps by Tattered Angels & Stampers Anonymous. Some stitching, misting & Stickles to accentuate my stamped images added the final touches to the background.

The 'artist' sentiment that I stamped directly onto my photo is by Stampers Anonymous. Ensure that any stamping done directly on photos is with permanent inks such as StazOn or else your stamped image will smear.

The red velvet flowers were by Petaloo & the silver ones by Prima. Here you can see a close up of the stamped flourish border & how I dressed up the flourishes with a bit of Diamond Stickles. The flourish stamp is from a set called Architectural Trims by Tattered Angels.

This next screen shot shows a bit of the zig-zag stitching I did & a texture stamp by Stamp Enjoy titled Volutes et Ronds. I have to say that I'm in love with this stamp. I've used it in just about all my backgrounds because it adds just the right amount of grungy texture.

Tip: Dress up your stitching with a bit of Stickles. I added two drops of Silver Stickles in between each zig-zag stitch to give the stitching a different look.

Here's a close up of some heavy hole punch distressing that I did to the corner of my photo. Just take hole punches of different sizes & randomly punch away at a corner--then ink it up with some distress inks. I used Tea Dye distress ink on my photo. This technique I got from Irene Tan better known as Scrapperlicious.

This very cute little 'artist' stamp is by Stamp Enjoy titled Abreen Artiste. I colored her with Prismacolor markers & dressed her up with Stickles. I used a bit of light pink chalk to add the pink glow on her cheeks.

This final screen shot shows again the Volutes et Ronds stamp as well as the corner angle stamp by Stamp Enjoy titled Naturel. Once again, you can see in this screen shot how I used the Stickles to dress up my stamped images.

Thanks to all of you who take the time to stop by. I hope this page inspires some of you to create your own backgrounds with stamps!

Till my next post...


Jul 7, 2011

Dance In The Rain Card


Happy hot July fellow scrappers! Today's post is actually a card...something I haven't done in a while. I decided to play with a bit of alcohol ink & acrylic in order to give this card a unique 'rainy' look.

The card itself is made from acrylic. I inked it with a bit of Sailboat Blue, Butterscotch & Stream alcohol ink with a concentration on the Stream ink. I wanted that green-blue look to simulate rain. I then ran the acrylic card through my Big Shot in order to emboss it. I used Tim Holtz's Retro Circles embossing folder which to me looked like the perfect background to imitate large drops of rain or water.

The cute little girl stamp is by Stamp Enjoy. I colored her with Prismacolor markers & further decorated her with Crystal Stickles & her umbrella with Black Diamond Stickles. I discovered that adding any kind of clear Stickles to just about any stamped image really adds more texture to the design & makes it 'pop' more.

The fence seen behind my little girl was made with Martha Stewarts Deep Edge Garden Trellis punch.

If you look closely at the flowers & the leaves you'll notice little clear dots that almost look like drops of water. TIP: To simulate drops of water on your projects use Rangers Glossy Accents. Randomly apply small dots on your embellies. When the glossy accents dry they look like drops of water. A great way to simulate rain or drops of water for any water themed project.

The white flowers, leaves & the vine going up the side of the card was actually all part of a Prima Vine. I simply ripped the poor vine apart & arranged them as you see here. :-)

Inside the card is a stamped quote by Tim Holtz Stampers Anonymous titled The Storm. The quote was stamped onto a piece of white vellum & adhered with vellum tape.

I hope seeing this card inspires some of you to play with acrylic & alcohol inks. The combination of these two things really does give any project an amazing texture.

Thanks to all of you who take the time to stop by!

Till my next post...

Jun 23, 2011

Precious Memories Layout


Good evening once again fellow scrappers & bloggers. Today's page is one I made for Stamp Enjoy as well as for a good friend & co-worker of mine. My friend has two little girls & I've already had the pleasure of scrapping one of them. Check out this little cutie here. I couldn't forget his other little girl in addition to the fact that her dad told me that she got a little pouty because there was no page for her. So here it is! Am hoping she likes it as much as her sister liked her page. :-)

As usual, I couldn't leave my stamps aside for this one even though the paper I used for my background came fairly decorated already. I further added to the background by adding some stamping, misting & Stickles.


A closeup of the misting & stamping. This clear butterfly is a stamp by Stamp Enjoy titled Butterfly in the Grass. I stamped it with StazOn black ink onto a piece of acrylic, cut it out & then colored in the wings with purple & Diamond Stickles. Tip: if you're planning on doing this technique, remember to add the glitter on the opposite side of where you stamped. When the glitter dries flip the image back around, adhere & you're done! I also added black Stickles to the body of the butterfly.

The heart seen here is also a stamp by Stamp Enjoy titled Heart Foliage.

The red cardstock seen behind the photo was dry embossed. I then sanded down the embossed image.

This rose stamp is a newly released stamp by Stamp Enjoy titled Roses. Just like the butterfly stamp--I stamped the rose onto acrylic paper with StazOn black ink, cut it out & decorated it with some Diamond Stickles.

The white border you see going around the picture is actually white acrylic paint that I tapped on with a stipple brush.

A closeup of the other rose stamp found towards the bottom of the page & more misting. By the way, I used Scarlet glimmer mist on this page.

Finally, a closeup of my second butterfly & the fence. The fence is made out of wood. I painted it with crimson red acrylic paint. Once it dried I spread Black Diamond Stickles all over it with my finger in order to give it a 'stone' type texture.

Other stamps used on this page are by Stampers Anonymous & Tattered Angels.

Thanks to all of you who take the time to stop by my blog...I appreciate it!

Here's the list of stamps I used by Stamp Enjoy.

Till my next post...


Jun 21, 2011

Love Tag


Good evening once again fellow scrappers! Summer has officially begun--let the humidity begin. Many of you may cringe when I say that--but here in the East coast--I prefer the Fall/Winter over the summer. UGH!

Today's post is actually a tutorial that I have provided for Stamp Enjoy. They have a collection of tutorials that you can find here. You can find a printable PDF tutorial for this tag here.

I used a couple of stamping techniques on this tag & lots of inking. The primary technique I used was on making the background of the tag. I used the 'resist emboss' technique. With this technique you heat emboss a stamped image--usually with clear embossing powder. Once the image is embossed it will 'resist' any inking done over the image. Here are some more highlights.

This clear butterfly is a stamp by Stamp Enjoy titled Butterfly in the Grass. I stamped on a piece of acrylic, cut out the image & then added some Stickles.

This is a slightly different version of the Glass Flower tutorial that I've shown in the past. You can find a tutorial on Glass Flowers in my blog here.

The 'Love' tag was made by first heavily spritzing it with Smooch spray & then stamping it with a Stamp Enjoy stamp called Love.

Finally the flourishes were made by using the Elegant Flourishes die by Tim Holtz. They were cut from grunge board, inked, heat embossed with distress embossing powder & inked yet again.

For a step-by-step tutorial on how I made this tag--feel free to visit the Stamp Enjoy blog under the 'Tutorial' category.

Thanks to all of you who take the time to stop by--it's always so very much appreciated.

Till my next post...